
1/9/26 – I’m thrilled to introduce the biggest feature in our newest update: Adventure Challenges! This has been one of our most requested features for a long time, and it’s finally here. On our new Adventure Challenges section, you can customize how you complete an item, add comments about your adventures, and share your progress with friends! I have updated this blog post with information about this new feature. I hope it is helpful for you! – Kayla
Did you just join the 365 Mile Challenge and have a question on how the app works? Or, maybe you’re a long-time member and want a refresher on the app? Either way, you’ve come to the right place! The 365 Mile Challenge App is available for download in the Google Play Store and the App Store. The log in credentials are the same for our app and our website. So, if you purchased a challenge registration already, use the same credentials to log in to the 365MC app. I will be going over the main features of the app to help you navigate through it and take full advantage of all of its features.
Table of Contents


Dashboard
The Dashboard is the first screen you will see when you open the 365MC app. Here, you can view your progress for all of your current challenges. Tap on Week, Month, or Year to view your progress on the graph for the selected time interval. You can also view your notifications by tapping on the bell icon in the top right corner. A yellow dot will appear on the bell icon when you have a new notification.
Scroll down to view your distance covered by activity. All of the activities that you have done for the challenge will be displayed above the second graph as color-coded activity icons. Just tap on any of these activities to view your progress for the selected activity. If you’ve done more than 5 activities, you can scroll to the left on the activity icons to see the end of your list.
Community

The Community is where you can share your successes, ask for support, and cheer each other on! Only participants of one of our current challenges will have access to this community message board. We take your privacy seriously. No one else will see any posts.
You can sort by challenge or announcements, and filter by post date or popularity by the indicated icons on the top right corner. You can also use the search bar to search posts by text located on the top of the screen.
Like posts or comment on posts by tapping on the blue Like and Comment icons, respectively. You can also view who liked a post by tapping on the yellow Like icon, or view replies by tapping on the purple Replies icon. Tap on any image while in the Community to view the image enlarged.
You may have noticed that some people have Ambassador or Team Member next to their name. Our ambassadors have the Ambassador name label, while Val and I have the Team Member name label. We’ve added these name labels, so that you can identify who is here to help. Look out for posts from us and feel free to ask us questions.
To create a post, tap on the yellow feather in the bottom right corner. I encourage you to post about your progress, how you got your miles for the day, ask questions, or ask for support; just like on our Facebook group! You will have the option to format your post and add a link or photos, if you want to. You can add up to 2 photos per post by tapping on the image icon at the bottom of the screen when creating or editing a post. The 365MC app will only have access to the photos you select. Additionally, you can mention someone in a post or comment with a tag by typing the @ symbol. A list of names will appear after this symbol to choose who you want to tag. When you are done, just tap on the feather in the top right corner to post it.

Pedometer
Our pedometer counts your steps, duration, average speed, and distance. All you have to do is tap GO, choose your activity, and start moving! Activities can be walk, run, or hike. Other activities cannot be accurately measured by a pedometer, so they are not options. The pedometer will record your steps in the background, so you can turn off your screen to save your battery.
Use the Pause button if you are taking a break and the Stop button to end the activity. A message will pop up when you tap on the Stop button that will ask “Do you want to log the data?” Choose “Yes” if you want to log the miles or “Delete” if you want to discard the entry. If you choose “Yes”, it will then prompt you to choose which challenges to apply the distance to. Once you added the distance to your challenge(s), you are done and the log entry can be viewed in Log History.
Log Distance
Log Distance is where you can enter a distance manually, which you can do in three easy steps. Step 1 – select your activity from five common activities (Walk, Run, Hike, Bike, Paddle) or Other. Other is a great option if you’ve done something other than one of the five listed activities or if you want to use our conversion chart to automatically convert time into distance. Step 2 – fill out the date of your activity and your distance. You may choose a date as far back as the start of your challenge. Other optional fields, which include duration, elevation, and notes, are available for you to fill out if you want additional information in your log entry. Step 3 – select your challenge. You have the option to add your distance to all or some of your current challenges. Just tap on the checkbox next to a challenge to select it. Lastly, you can choose whether you want your log entry to be posted on the Community. If the Public/Private switch is set to Public, your log entry will post on the Community message board. If it is set to Private, it will not be shared. Lastly, just tap FINISH to submit your entry.
Our conversion chart is fully integrated into the 365MC app that will automatically convert your duration into distance! All you have to do is choose Other in Step 1. Then, choose your activity from the dropdown menu and input your duration in Step 2. Your distance will automatically fill in! If you’ve completed an activity not on our conversion chart, then you can either choose the closest activity for automatic calculation of your distance or you can choose Other on the bottom of the dropdown menu to input your own distance.


My Profile
My Profile is where you can update your personal information, add a profile photo, change your password, or delete your account. You can update your username, first and last name, as well as optional information like age and motivation. Once you updated your information, tap on the checkmark on the top right of the screen to save the changes. Your email can only be updated on our website by going to the Account Info tab on My Account.
If you delete your account on the app, all of your data will be deleted from our server. You will loose all of your data and it can’t be recovered. It is irreversible. Please only use this option if you are sure you want to permanently delete your account. If you have an issue with your account, please contact us first so we can try to remedy the issue.
Side Navigation Menu
The side navigation menu is where you will find a list of many handy options. You can bring it up by tapping on the hamburger menu icon (the three lines) on the top left corner of your screen. Now I will go over the most important items on the side navigation menu, as the rest of them are mostly self explanatory.

Badges

Earning badges is a fun way to stay motivated throughout the year! There are two types of badges that you can earn on the app – Personal Badges and Challenge-related Badges. Personal Badges can be located on the navigation side menu. You will not have a badge icon on your side navigation menu until you earn a badge. When you earn a personal badge, a badge icon will appear on the top right corner. Tap on the badge icon to view your personal badges. You can scroll left on the row of badges to view all of your earned badges, as well as the ones you haven’t earned yet. The badges that you haven’t earned yet will be greyed out and cannot be tapped on until you earn it. Though, you may tap on any of your earned badges to view them. You will have the option to share your earned badges with our Community as a post by tapping on the feather icon or share it through your phone options (email, text, social media, etc.). These badges will reset every year, so you can keep earning them again and again!
Challenge-related Badges can only be earned with the 365 Mile Challenge. They are all based on your progress in the challenge, and can be found by going to Challenges -> In Progress -> your current 365 Mile Challenge -> Badges You’ve Earned button. For more information on Challenge-related Badges, please see Challenges below.
Apps and Devices
You can connect popular fitness apps and devices to the 365MC app, including Fitbit, Garmin, Google Fit, iHealth (for iOS only), Map My Apps, and Strava. Connecting to a fitness app/device will sync your distance data (and your activity data for Garmin, Strava, and the Map My Apps) to our app. To do so, just tap on the app/device that you want to connect to. You should be taken to your fitness app/device’s log in page. Log in to your fitness app/device’s account and agree to connect it to the 365 Mile Challenge App. Then, it should take you to the Dashboard. The process to connect each app/device vary slightly, but they all should follow this general format. Once you successfully connected a fitness app/device to the 365MC app, it will say Connected next to the fitness app/device.
To make sure that connected apps/devices don’t record the same distance multiple times, you can only have one app/device connected at a time. However, you are able to remove or change your connected app/device at any time. The 365MC app will start syncing data with your connected app/device from the time you connect it to when you disconnect it. No distance or activity history will be synced to your account. Even if you keep your fitness app/device connected all the time, I recommend opening the 365MC app once in a while. The 365MC app will sync data with your connected app/device whenever the 365MC app has been opened. It can sync multiple days at a time (as long as it’s connected), but if you don’t open the 365MC app by the end of a challenge, your total distance may be off. Plus, you can view your progress and keep in touch in the Community message board! If your miles for the day are off, try completely closing the 365MC app and reopening it. That usually fixes the problem and syncs to your connected app/device.
Please note that you cannot pick and choose which distances are synced to the 365MC app. All miles from a connected app/device will be synced. If you want to log only certain miles, connect the app/device right before you start your miles and disconnect the app/device afterwards to avoid unwanted miles counting towards a challenge. Alternatively, you can use our pedometer or log your miles manually.

Challenges
Challenges is broken up into three tabs. The first tab, All Challenges, shows all of our challenges. You can tap on any of them for a description of the selected challenge. You will also see a Join button that when tapped, will take you to our store on our website to register for the challenge. Registration for a challenge is required to have access to our app’s features. You will have access for the duration of the registered challenge. When you have a current registration for a challenge, the Join button will change to Joined.
The In Progress tab is where you will find all of your current challenges. Tap on one of these challenges for a more detailed look of your progress. You can also change your yearly goal for the challenge. For example, if you are going for a Double, Triple, or Xtreme in the 365 Mile Challenge, you’ll want to edit your goal here. Just tap on the edit icon on the top right corner of the screen. You can edit your goal to 1X, 2X, 3X, or a custom goal. This goal will be reflected in the progress bar for your challenge.
Additionally, you can find your Challenge-related Badges for the 365 Mile Challenge by tapping on the Badges You’ve Earned button on the bottom of your 365 Mile Challenge screen. You can only earn these badges from the 365 Mile Challenge and they all have to do with your progress in the challenge. When you earn a badge, you can view it here. There are also options for you to share your badge with the Community as a post or share it by one of the options on your phone (email, text, social media, etc.). As these badges are only for the 365 Mile Challenge, you can earn them every year you participate in the challenge.
The last tab is called Completed. This tab is where all of your completed challenges are located. Once a challenge ends, it will show up here. You will have a grace period of seven days to add any remaining miles for the challenge and then end your challenge by tapping on the End Challenge button that will appear on the last day of your challenge. This button will be located on your Dashboard. After the seven day grace period, your challenge will end automatically. You will not be able to add, edit, or delete any miles once a challenge is completed.
Tap on any of your completed challenges to see your how you did. Your Finisher’s Certificate will be located here for each of your challenges as well. Share your certificate with the Community or with your phone options just like you can with your badges. You will also have the option to download your certificate as a PDF by tapping on the Download Certificate option on the top of the screen when viewing your certificate.
Adventure Challenges *New*
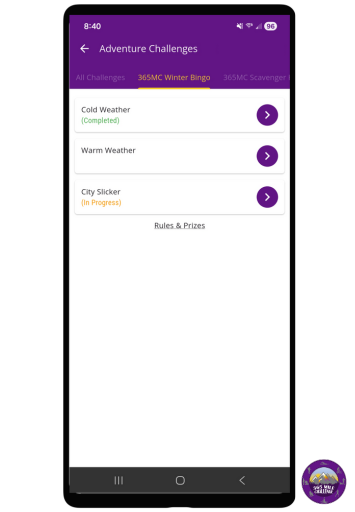
I’m thrilled to introduce the biggest feature in our newest update: Adventure Challenges! This has been one of our most requested features for a long time, and it’s finally here. Adventure Challenges are fun, activity-based challenges that you unlock when you join the 365 Mile Challenge. For a schedule of our Adventure Challenges, go to our Adventure Challenges page or on Adventure Challenges in your 365MC app. You can find it on the side menu. When an Adventure Challenge begins, it will appear as a new tab in Adventure Challenges. Here’s how to play!
Challenge Overview
When you tap on a challenge’s tab, you will be taken to the challenge’s overview screen. Here, you will see a list of card options. Choose any card by tapping on the play button. Once you start a card, it will say “In Progress” under the card name until it is fully complete. When you finish a card, it will change to “Completed”.
On the last day of an Adventure Challenge, an “End Challenge” button will appear on top of the challenge overview screen. Like for our other challenges, you will have a 7-day grace period to finish your challenge. When you end the challenge with the button or the grace period ends, your challenge is over. You will not have access to your cards once the challenge has ended, and your cards will disappear from the app. Make sure you save any images of your cards, if you wish to, before they are gone. There is a share feature under each card to easily share an image of your card using your phone share options or on our Community message board.
Bingo
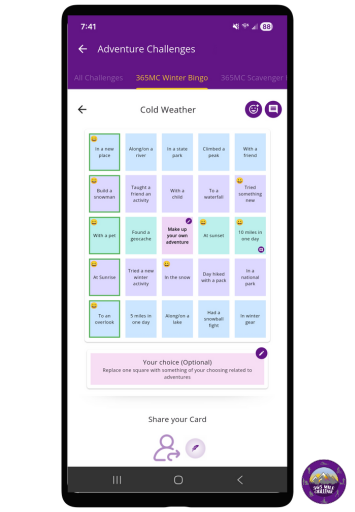
Once you select a bingo card, you’ll be taken to the card overview. You can now mark off bingo squares and add comments to your card. Your card has two views you can switch between—emoji and comment—to make it easy to track progress and add notes. Use the emoji icon and comment icon on the top-right corner to choose your view. And, when you want to exit out of a view, tap on the X in the left-top corner to get back to the card overview. You can also use the back arrow on the card overview to go back to the challenge overview screen.
To mark a bingo square as complete, you first have to choose your emoji that will be used as your marker. Tap on the emoji icon in the top-right corner, choose your emoji, and then tap on any square to mark it as complete. Make sure you save your progress when you are done! When you complete a full line in bingo, each of the bingo squares in that line will get green boxes around them to indicate that it is complete.
Use comments to capture notes, memories, or fun details about your adventures. Tap on the comment icon in the top-right corner and then any bingo square to add a comment to that bingo square. A pop-up will appear where you can type in your comment. Afterwards, a comment icon will appear on your bingo square where you can view or edit your comment.
Our bingo cards include two customization features. You can replace any one square by tapping the “Your Choice” option at the bottom of the card, selecting the row and column of the square you want to change, and typing in your custom text, which will then replace the selected square. This option can be edited or deleted using the edit or delete icons on the “Your Choice” option. Additionally, the “Make Your Own Adventure” square is located at the center of the bingo card and allows you to choose any adventure you like—simply tap the edit icon in the top-right corner of the square and type in your chosen adventure.
Scavenger Hunt
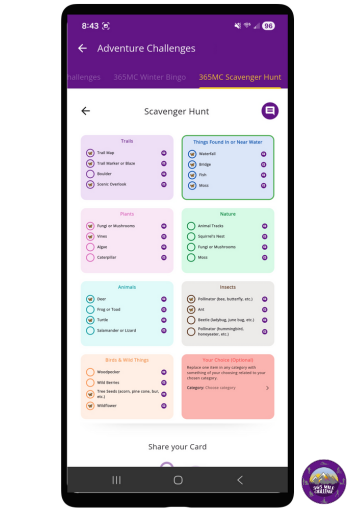
The Scavenger Hunt works a lot like bingo and includes a card overview, plus emoji and comment views. You can switch between views by tapping the emoji or comment icon in the top-right corner of the card, and return to the card overview anytime by tapping the X in the top-left corner. From the card overview, you can also use the back arrow to head back to the challenge overview.
When you find an item in the scavenger hunt, you can mark it as found. To mark an item as complete, start by choosing the emoji you’d like to use as your marker using the emoji icon, then tap any item to mark it off. Don’t forget to save your progress when you’re done! When you complete all the items in a category, you’ll see a green outline around it to show your progress. You can also add comments to any item by tapping the comment icon from the card overview, which shows a comment icon next to each item where you can add, view, or edit notes.
At the end of the scavenger hunt, you’ll find a “Your Choice” box that lets you swap out one item for something of your own—just select the category and item that you want to replace from the dropdown menus, type in your custom item, and you’re all set.
Log History

Log History is where you will find all of your log entries for the year. Tap on any of them to view more information about a specific log entry. You will find all of your activity information, as well as the source of the log entry, if it is private or public in the Community, and which challenges it is applied to. The yellow arrow under this information can be tapped on to share the log entry as a post in our Community.
Edit any of your log entries by tapping on the gray edit icon or the “Edit this log entry” option in the expanded view of a log entry. You can edit most of your information, like distance and activity. The only thing that you can’t edit is which challenge(s) the log entry is applied to. You can even edit your log entries from your connected fitness apps/devices. Since the fitness apps/devices sync throughout the day, the edit option will be available the next day as to not interfere with the connected fitness app/device.
If the log entry is from our pedometer or a manual entry, you will see a red trashcan icon next to it and a “Delete this log entry” option on the expanded view of a log entry. Tap on the trashcan icon or “Delete this log entry” to delete it. Although they can be edited, log entries from a connected app/device cannot be deleted, because of how they are synced with the app. Please be careful when connecting an app/device to avoid unwanted log entries.
On the top right corner of Log History, there is a plus sign. Tapping on it will bring you to the Log Distance feature where you can manually log a distance.
Settings
Set up how the 365MC app functions in Settings. It is a good idea to go into Settings when you first download the app and change any of the options to make sure it runs how you want it to. If the setting is a switch, just tap on the option that you want to edit your settings.
The first setting option is Push Notifications. Turning push notifications off means that you will not receive any push notifications at all – not when you receive a badge or finisher’s certificate, not when you get a like or comment on your post, and not for important announcements about the challenge. I recommend keeping push notifications on to receive important notifications about the challenge. We don’t spam push notifications, I promise!
Choose the distance and elevation units that you want to use in the next section. Choose between miles and kilometers for distance, and feet and meters for elevation. These units will be used on your graphs, the pedometer, and as default for the Log Distance feature.
It is important to change Time Zone to your time zone, as challenge start and end times are based on the selected time zone. If it is not on your time zone, your challenge may end a couple hours before or after it should. All US and Canadian time zones are available to choose from on the dropdown menu.
“Start of the week” is a setting for you to choose when you want a new week to start on your Week graphs. Choose between Sunday and Monday. This is just for your personal preference, and doesn’t affect the challenge.
“Make account public” lets you choose if you want your log entries to be defaulted as public or private. When you add a log entry by our pedometer or manually, you can always change if you want a specific log entry to be public or private.
Troubleshooting
Are you having an issue with the 365MC app? Perhaps it stopped working as intended or it crashed? Like with any app, there could be a variety of reasons why there is an issue. Here are some things you could try to fix the problem.
- Restart the 365MC app by closing and reopening it.
- Restart your device. Sometimes your phone just needs a good restart.
- Update your device or the 365MC app. Check if there are any updates for the app or your device’s software, and update it if there is one available.
- Clear the 365MC app’s cache to remove any unnecessary files. Go to Apps in your device’s Settings, choose 365 Mile Challenge, tap on Storage, and then tap on Clear Cache. This process may differ depending on your device.
- Check your device’s storage. You may not have enough storage space to run the app.
- Check your WIFI or data connection. You may not be connected to the internet, or it could be an unreliable network.
- Uninstall and reinstall the 365MC app. Sometimes there is an issue with the installation of an app, so reinstalling it helps.
- If you’re still having issues after you’ve tried all the above, please contact us.
Val and I put our hearts and souls to develop the 365 Mile Challenge App and make it great for you – our members. I hope that this overview has helped you to fully take advantage of our app and all of its awesome features. Please take a look at the FAQs about our app, which can be found on the side navigation menu of the 365MC app. And, I hope you come to love it as much as we do!


I’ve been having problems getting my fitbit to sync when I finish a walk. I’ve been disconnecting my fitbit and then reconnecting and then it downloads the distance. The first time I tried it, it was 1/2 hr after my walk so I was wondering if it was including any steps that I took in the meantime. I will try closing and opening the 365 app and see if that works better. By the way, I would suggest notating “365 app” vs just the app. It might make it a little clearer. On the first read I wasn’t sure which app you were talking about in that section.
Hi Jennifer! Kayla also uses a Fitbit and she said that it doesn’t download the distance until she closes and reopens our app, so if you haven’t yet, please try that. It has something to do with how Fitbit downloads their data and out of our control unfortunately. Thanks for the suggestion for the post. I’ll pass it along to Kayla! ~Val